As living standards continue to rise, increasingly stringent demands are being placed on the soldering reliability of electronic products across all sectors.
The entire industry is conducting ever more detailed research into the depth and breadth of electronic assembly and smart manufacturing.
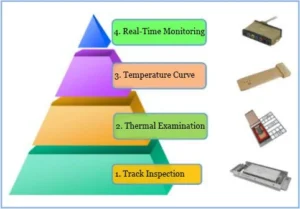
Temperature profiles are no longer the sole process indicator for good soldering quality. For SMT process control, a pyramid structure is employed (as shown in Figure 1).
First, the foundation at the base of the pyramid (reflow oven health checks) must be secured. Only after this foundation is established do temperature curve tests become meaningful.
The apex of the pyramid is the real-time reflow monitoring system, which automatically tests the temperature profile of each board.
Barcodes link to individual board profiles, with data uploaded to the MES system for traceability. This article focuses on reflow oven health checks, encompassing both track mechanism and thermal inspections:
1) Track mechanism inspection includes: track deformation, leveling, and vibration.
2) Thermal inspection includes: thermal convection, thermal uniformity, thermal equilibrium, thermal shock, thermal stability, thermal compensation, and chain speed fluctuation rate.
3) Detailed explanations and case studies regarding reflow oven inspections will follow.
Track Inspection
-
Track Deformation
Traditional Control Method: Manually testing track deformation at various positions using standard plates or micrometers during cold furnace conditions.
Due to thermal expansion and contraction, deformations observed in cold furnace states differ from track conditions under high-temperature production environments:
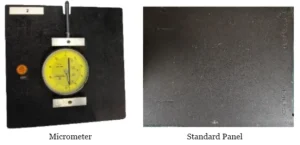
Advanced Technology: By adjusting the instrument calibration to the track width, the compression elastic device is positioned atop the track chain.
When the track widens, the instrument’s elastic system expands outward; when the track narrows, the elastic system compresses.
This system continuously records the deformation of the entire welding furnace track throughout the heating process.
-
Track Vibration
Traditional Control Method: Shut off all hot air motors in the soldering oven. Place a coin on the circuit board during oven passage. If the coin remains upright, the oven’s vibration is deemed acceptable.
Advanced Technology: Utilize the instrument’s built-in vibration sensors to record vibration data throughout the entire conveying path of the soldering oven track during heating.
This includes vibrations in the forward/backward, left/right, and up/down directions. The recorded vibration curves provide a detailed analysis of vibration levels in each temperature zone.
-
Track Leveling
Traditional Control Method: Open the furnace lid and cool to room temperature, then test with a leveling instrument;
Advanced Technology: Utilize the instrument’s built-in leveling sensor to record horizontal data along the entire conveying direction and lateral movement of the welding furnace track during heating.
The recorded leveling curve provides a visual representation of the leveling status in each temperature zone.

-
Case Study
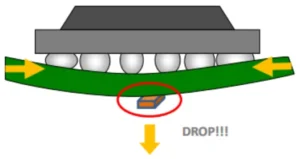
1. Severe rail deformation leading to component loss and misalignment
Customer Countermeasures:
- Furnace temperature test—Passed;
- Added air hood—Ineffective;
- Maintenance—Ineffective;
- Switching production lines—Normal.
Cause Analysis:
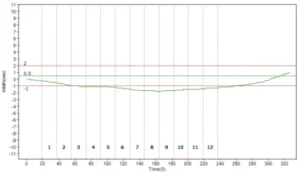
Test results indicate maximum deformation occurred in Zones 8, 9, and 10, with maximum deformation reaching -1.9mm, far exceeding the industry reference standard (-1.2)mm specification.
The deformation manifests as narrowing. When the track narrows by 1.9mm, the PCB temperature in the reflow zone exceeds its Tg value, rendering the board flexible.
Under these conditions, the board bends, disrupting the surface tension of solder beneath components and causing component quality issues.
Solution:
Calibrate and perform maintenance on the track deformation to resolve the track deformation issue.
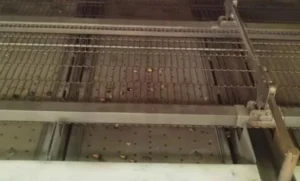
2. Continuous track vibration causing parts to fall off and misalignment.
Customer Countermeasures:
- Soldering oven comparison — 1 unit;
- Temperature profile — Pass;
- Upper/lower temperature adjustment — Ineffective.
Cause Analysis:
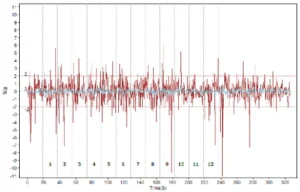
The mechanism causing component loss is significantly related to track vibration. Track vibration exceeding industry specifications (±2g%) by fivefold is the most direct and critical factor.
During secondary reflow, components on the board bottom, in the reflow zone (Zones 9-12), where solder is molten. Components remain in place solely due to solder surface tension counteracting gravity.
However, vibration in Zone 9 reaches a maximum of -11g%, continuously weakening solder surface tension. This reduces surface tension below gravitational force, causing component loss.
3. Intermittent track vibration
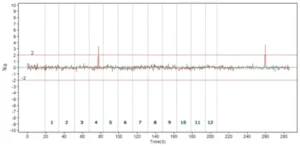
Improvement measures:
- Lubricating the conveyor chain—ineffective;
- Replacing the conveyor chain—ineffective;
- Replacing the support shaft—showed improvement;
- Replacing the motor chain—finally resolved the issue.
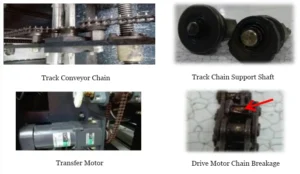
Root Cause Analysis:
A link in the track conveyor motor chain has fractured (as shown in Figure 9). When the motor rotates to the fractured chain position, friction with the fractured surface causes momentary vibration.
This vibration recurs each time the motor returns to that position. Since the vibration is intermittent rather than continuous, it is difficult to detect. The issue was ultimately resolved by replacing the motor chain.
Thermal Inspection
-
Hot Air Convection
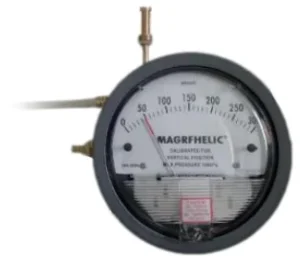
Traditional Testing Method: Open the reflow oven lid, turn off the heating system, and use a pressure gauge (as shown below) to measure each air outlet individually.
This method involves significant labor, yields inaccurate data, and does not reflect conditions under high-temperature environments.
Advanced Technology: Utilizes a specialized reflow flow detection module within the high-temperature environment to measure the entire process of hot air convection within the furnace chamber.
It analyzes the full-process hot air reflow rate at designated positions. Stable and centrally positioned detection results indicate optimal performance.
Reflow ovens employ hot air convection for heat transfer to heat products.
The intensity of this reflow directly impacts soldering quality.
Only an appropriate, consistent reflow rate throughout the process ensures excellent soldering results.
Case Study:
Analysis of Unexpected Offset Failure in a Large Inductor
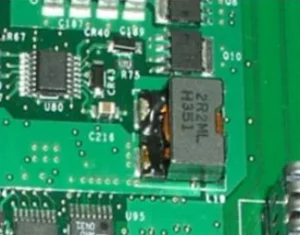
Problem Statement:
After passing through the reflow soldering oven, a customer’s factory discovered severe misalignment of large inductors near the fixed edge on their manufactured products.
Customer Countermeasures:
- Oven temperature test—passed;
- Level test—passed;
- Coin Test — Passed;
- Added Airflow Cover — Ineffective;
- Maintenance — Ineffective;
Failure Mechanism:
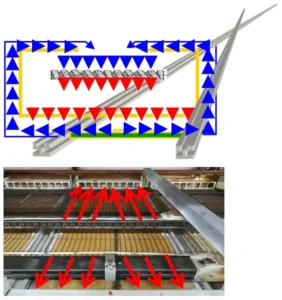
The customer’s current furnace is a large-circulation structure furnace. The characteristic of this welding furnace’s air duct structure is that return air flows along both sides of the furnace (in the fixed and moving rail directions).
Therefore, the hot air blown from the rectifier plate vents collides perpendicularly with the PCBA for heat exchange. Afterward, the airflow returns along the PCBA surface toward the fixed and moving rail directions.
The air from each vent converges laterally along the PCBA surface. The closer to the fixed rail return vent, the stronger the converging lateral airflow becomes.
At the moment of solder melting, this strong lateral airflow deflects the large inductors.
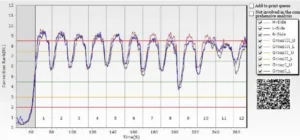
Meanwhile, our testing revealed that the average airflow per heating zone ranges between 8.0 and 9.5, significantly exceeding the industry standard of 4.5 to 6.5.
This excessive airflow causes misalignment of large inductors at the fixed-track position.
Solution:
Set the airflow frequency based on the product dimensions and board thickness to ensure thermal compensation capability while preventing misalignment failures.
Adopt a reflow oven with a micro-circulation structure, where the air duct design features return air around each outlet.
This prevents component misalignment caused by accumulated lateral airflow affecting components with large surface areas near the return air vents.
-
Thermal Uniformity
Standard Testing Method: Temperature measurement points are embedded at the left, center, and right positions of the copper plate.
Due to the copper plate’s inherent high thermal conductivity, minimal temperature variation exists between these points.
This design contradicts the fundamental principles of the soldering furnace itself and fails to accurately reflect the temperature gradient across the furnace’s cross-section.

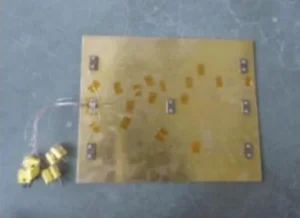
Advanced Technology: Under high-temperature conditions, detect and analyze the lateral heating efficiency uniformity of each heating zone, examine thermal efficiency differences between fixed and moving sides of the track, and conduct comprehensive process analysis.
Lower detection results indicate better performance.
Poor uniformity signifies high lateral risk, meaning temperature profiles obtained from test plates cannot accurately represent the actual temperatures of other components on the product that are similar to the tested component.
Case Study – Poor Thermal Uniformity
Problem Statement:
A factory failed customer audit due to thermal uniformity test values exceeding 8°C (as shown in Figure 17), while the customer required values within 5°C:
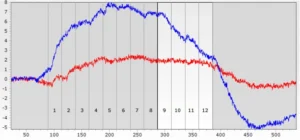
Root Cause Analysis:
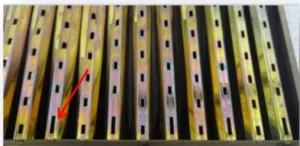
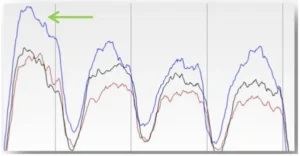
Design flaws in the furnace duct structure resulted in excessive hot air flow at the fixed rails (due to enlarged vent openings) and elevated temperatures along the fixed edges.
This caused significant temperature differentials across the rail cross-section (as shown in Figure 18).
Solution:
Block the larger fixed-side ventilation openings to reduce the temperature difference across the track cross-section.
-
Thermal Equilibrium
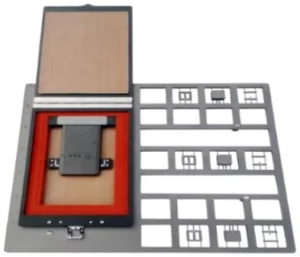
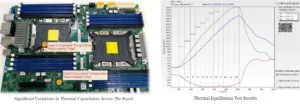
A novel scientific calculation method that quantifies thermal balancing capability by analyzing the thermal efficiency equilibrium throughout the reflow soldering process.
This is achieved by monitoring the heat absorption process of multiple standard modules with varying thermal capacities.
If thermal efficiency variations are significant: Components of different sizes (thermal capacities), such as OFP and CPU sockets (as shown below), may exhibit substantial temperature differences during soldering.
This can lead to difficult or impossible debugging to achieve required temperature curve settings, resulting in poor process CPK. Significant differences in alloy structure:
-
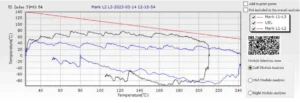
Thermal Shock
Analyze temperature differentials between the component’s interior, surface, and the furnace environment.
Combine this with the component’s thermal shock tolerance specifications for graphical analysis. Examine surface and internal thermal shock throughout the entire reflow soldering process.
Higher test result data indicates better performance. Significant thermal shock may damage components during soldering and cause severe quality issues such as solder popping, solder balls, solder bridging, component standing, and misalignment.
It also increases the difficulty and time required to debug a qualified profile, thereby impacting production.
Necessity of Testing: Significant thermal shock may cause component damage during soldering and result in severe quality issues such as solder blisters, solder balls, solder bridging, component warping, and misalignment.
It also increases the difficulty and duration of debugging to achieve a qualified profile, thereby impacting production.
-
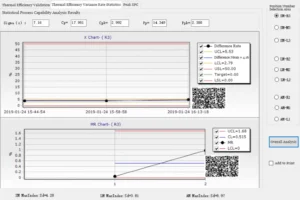
Thermal Efficiency Stability
By measuring heat absorption across different modules, we analyze the stability of the entire reflow soldering process—not just peak temperatures or isolated parameters, but the entire soldering cycle.
Through statistical analysis of thermal variation, we make informed judgments about the stability of the oven’s heating efficiency.
This comprehensive analysis evaluates heating curve stability and assesses thermal efficiency stability in each heating zone. Lower stability measurement data indicates better performance.
Test results enable rapid identification of reflow oven performance issues, enhancing diagnostic efficiency and maintenance effectiveness.
Low stability indicates significant temperature variations during actual soldering, rendering temperature profile data from test boards unreliable and potentially causing severe quality defects.
-
Thermal Efficiency Stability
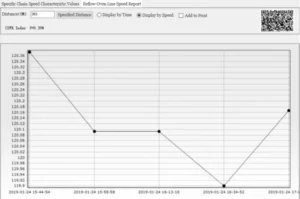
Intelligent detection analyzes track conveyor speed and long-term stability. Lower detection results indicate better performance. Multiple solutions are available.
This solution calculates chain speed based on welding time and heating zone length. Significant fluctuations in track chain speed directly cause welding time to become uncontrollable, thereby compromising product quality assurance.
-
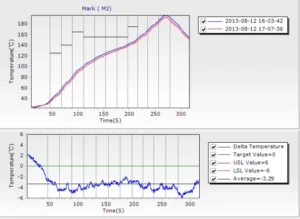
Empty/Full Load Thermal Compensation Capability Analysis
By comparing and analyzing test results under both full load and empty load conditions, the reflow oven’s load-bearing capacity is verified.
Under full load conditions, standardized load boards with known thermal capacities must be used for testing.
The heating efficiency and thermal compensation capability under standard low thermal load and standard high thermal load conditions are evaluated.
Lower test result data indicates superior performance.
Reflow ovens with strong thermal compensation capability under both empty and full load conditions can adapt to the production of products of varying sizes and different output rates.
If the empty/full load capability is insufficient, the oven’s load capacity will be low, potentially leading to serious quality defects such as cold solder joints.
Welding Furnace Inspection Applications
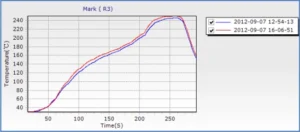
Welding furnace inspections serve various purposes: furnace retrofitting, new furnace evaluation, new furnace acceptance, maintenance verification, quality analysis, etc.
This section focuses on new furnace evaluation and acceptance:
New Furnace Evaluation and Acceptance: How can furnaces from different manufacturers be analyzed fairly and impartially?
By optimizing air frequency and furnace settings, all furnaces’ temperature curves are adjusted to a standardized baseline.
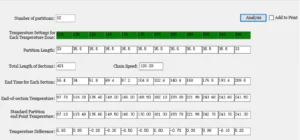
The standard temperature curve requires: – Traveling from the first heating zone to the last within the specified 210 seconds.
The temperature difference |t – t0| at the end point of each zone (where t is the zone’s final temperature and t0 is the corresponding temperature on the standard curve) must satisfy |t – t0| ≤ 2°C.
Conclusion
The foregoing content fully demonstrates that welding processes extend far beyond temperature curves.
Beyond temperature profiles, factors such as the flow rate of hot air from the welding furnace, track vibration, and deformation significantly impact welding quality.
Prior to implementation, thorough understanding of each piece of equipment is essential.
This requires comprehensive performance evaluations rooted in equipment fundamentals—including thermal compensation, flow rate calibration, track deformation, vibration checks, etc.), implement equipment modifications, and establish a robust, stable equipment foundation.
Only after completing these preliminary equipment inspections and improvements can the entire welding process gain fundamental assurance.
This approach reduces quality issues stemming from equipment itself, marking the first step toward achieving zero defects in welding processes.

