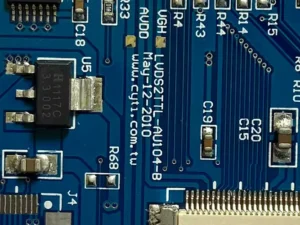
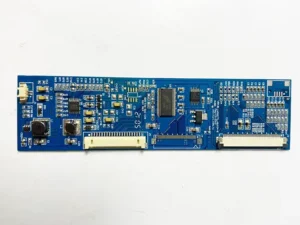
Wave soldering is a process that welds electronic components onto printed circuit boards (primarily involving flux application, preheating, soldering, and cooling).
It calibrates the instantaneous temperature indicators across different temperature zones (including preheating, soldering, and cooling zones) at conveyor speeds.
Since electronics manufacturers must ensure operational compliance with process requirements, no relevant calibration standards currently exist domestically or internationally.
Therefore, this paper proposes a calibration method based on the equipment’s structure and operating principles, combined with soldering process requirements, utilizing existing measurement standards.
The method undergoes experimental verification and uncertainty assessment.
Working Principle
Wave soldering equipment forms a solder wave by ejecting molten soft solder material (such as lead-tin alloy) through an electromagnetic pump.
A printed circuit board pre-mounted with components passes through this solder wave, establishing mechanical and electrical connections between the component leads or pins and the PCB pads.
Simultaneously, the equipment adjusts parameters such as conveyor speed, heating temperature, and heating power across different temperature zones (preheating zone, soldering zone, cooling zone, etc.).
Through these adjustments, the equipment achieves the nominal preheating and soldering temperatures required for different product processes and solder types.
This ensures the soldering quality of the PCB.
Its structural diagram is shown in Figure 1, primarily comprising a conveyor system, preheating system, soldering system, and control system.
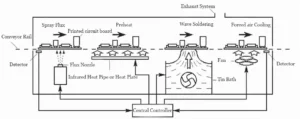
First, utilizing the action of a power pump, molten liquid solder forms a specific wave shape at the surface of the solder bath.
Then, the printed circuit board is placed on a conveyor belt and passes through the solder wave at a specific angle and immersion depth, thereby completing the solder joint formation process.
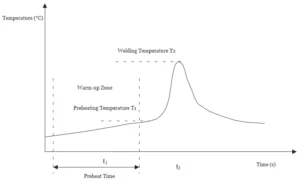
The single-wave temperature profile is shown in Figure 2.
Calibration Conditions
1. Calibration Items:
Temperature deviation during preheating and welding.
2. Measurement Standards:
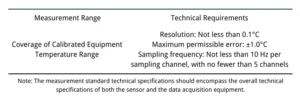
① Temperature curve tester. Equipped with automatic data acquisition and storage functions, and fitted with high-sensitivity thermocouple temperature sensors. Technical requirements are specified in Table 1.
② Temperature curve tester. Must be equipped with an insulated protective sleeve. Technical requirements are specified in Table 2.

3. Printed Circuit Board:
Positioned opposite the wave soldering equipment under test for arranging the temperature curve tester.
4. Nominal Temperature:
Preheating temperature and soldering temperature during the actual soldering process.
5. Calibration points:
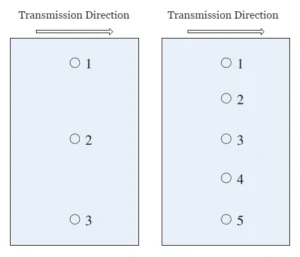
The sensor placement positions (1, 2, 3, 4, 5) serve as measurement points during calibration.
They are uniformly distributed along a straight line perpendicular to the transmission direction on the PCB’s soldering surface (or according to user requirements), as shown in Figure 3.
If the PCB width is ≤40cm, three temperature measurement points are required; otherwise, five points are required.
Calibration Method
Temperature Calibration
First, power on the wave soldering equipment to be calibrated, set the conveyor speed and heating temperature, and wait until it reaches a stable state.
Place temperature sensors on the printed circuit board and synchronize the number of temperature zones, zone lengths, and conveyor speed of the equipment in the temperature curve tester software.
Set the sampling cycle to 0.1 seconds. Next, place the sensor test board and the configured temperature curve tester onto the conveyor chain.
Pass through the equipment’s working zone at the set speed. Collect temperatures from the preheat zone and the soldering zone.
Generate the corresponding wave soldering temperature curve. Obtain the measured values for the preheat temperature and the soldering temperature at each measurement point.
Data Processing
1. Preheat Temperature Deviation
The formula for calculating preheat temperature deviation is:
-2-300x82.jpg)
In the formula: Δty—Preheating temperature deviation, °C; tymin—Minimum preheating temperature across all measurement points, °C; tyb—Nominal preheating temperature, °C.
2. Welding Temperature Deviation
The formula for calculating welding temperature deviation is:
-1-300x79.jpg)
-1-300x78.jpg)
In the formula: Δthmax, Δthmin—Upper and lower temperature deviations, °C; thmax, thmin—Maximum and minimum welding temperatures across all measurement points, °C; thb—Nominal value, °C.
Experimental Validation
To validate the feasibility and effectiveness of the calibration specification, the calibration method described herein was applied to calibrate wave soldering equipment.
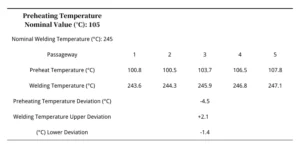
The results are presented in Table 3. The experiment demonstrates that this method effectively evaluates and reflects the metrological characteristics of the equipment’s temperature parameters, ensuring the reliability of these parameters during actual operation.
Uncertainty Evaluation
Based on the JJF 1059.1-2013 technical specification and relevant measurement-uncertainty evaluation theory, this study takes the upper deviation of the calibrated equipment (wave soldering equipment) as an example.
The uncertainty of the upper deviation in soldering temperature is evaluated using a temperature-curve tester (maximum permissible error ±1.0 °C, resolution 0.1 °C) as the measurement standard.
Measurement Model
The measurement model is calculated according to Equation (2).
Sources and Analysis of Uncertainty
1. Standard Uncertainty Introduced by the Reference Standard
(1) Standard Uncertainty Component u₁ Introduced by Resolution
With a resolution of 0.1°C and a half-width of 0.05°C, assuming a uniform distribution, the standard uncertainty component u₁ introduced by the reference standard’s resolution is:
-300x96.jpg)
(2) Standard Uncertainty Component u₂ Introduced by Accuracy
The maximum permissible error of the temperature curve tester is ±1.0°C. Assuming a uniform distribution, the standard uncertainty component u₂ introduced by the accuracy of the standard instrument is:
-300x97.jpg)
(3) Standard Uncertainty Component u₃ Introduced by Stability
The maximum variation in temperature correction values between two consecutive calibrations of the standard is 0.3°C.
Assuming a uniform distribution, the standard uncertainty component u₃ introduced by stability is:
-300x91.jpg)
2. Standard Uncertainty Component u₄ Introduced by Measurement Repeatability
At the calibration point of 245°C, the wave soldering equipment was repeatedly calibrated 10 times, yielding measurement data of 247.5, 248.3, 247.2, 246.8, 246.5, 247.3, 247.5, 247.8, 247.2, 247.3 (in °C).
Using the Bessel formula, the single-calibration value is obtained as:
-300x89.jpg)
When using a single measurement value as the measured value during actual measurement, the standard uncertainty component u₄ introduced by measurement repeatability is:
-300x67.jpg)
Combined Standard Uncertainty
Since the components are independent of each other, the combined standard uncertainty is:
-300x49.jpg)
Expanded Uncertainty
Taking the coverage factor k=2, the expanded uncertainty is:

Since the maximum permissible temperature deviation for wave soldering equipment is typically ±10°C, the measurement uncertainty meets calibration requirements.
Conclusion
In summary, this paper proposes a calibration method for wave soldering equipment, which has undergone experimental validation and uncertainty assessment.
The results demonstrate that this method can effectively calibrate preheating temperature deviation and soldering temperature deviation.
It exhibits strong operability and practicality, thereby adequately meeting calibration requirements.

